

Instead of manually copying HVAC inquiries into Jobber, configure a supported connection that passes qualified appointment requests from RelayKite into your scheduling process. For a Jobber AI scheduling integration in 2026, confirm the connection method and booking permissions first; this guide defines the workflow and acceptance checks, not an assumed native connector.
- RelayKite handles HVAC lead response and appointment setting; confirm Jobber connection support before planning automatic scheduling.
- A Jobber AI scheduling integration needs explicit booking permissions, customer matching, and confirmation rules.
- Use dispatcher approval when appointment requests need technician, territory, or service review.
- Confirm an appointment only after the scheduling destination accepts it; a collected preference is not a booking.
Why this matters
An appointment-setting conversation and a scheduled service visit are different outcomes. A prospect can provide an address and preferred arrival window without an appointment ever reaching the dispatch schedule. Your workflow must distinguish those states.
RelayKite is best suited to U.S. HVAC businesses seeking managed lead response and appointment setting. Connecting that service to Jobber requires a separate decision about how appointment information enters your scheduling process. Do not treat the service description as proof of a particular connector, synchronization method, or booking permission.
For your 2026 setup, define success as a traceable chain: inquiry received, details checked, appointment accepted, customer notified. If any link fails, the request needs a visible owner rather than a reassuring message that implies the work is scheduled.
Before you start
- Account access: Have an authorized Jobber account owner and the person responsible for your managed response setup available. Confirm which connection method is supported, what permissions it requires, and who can approve access. Never share account passwords as a substitute for an authorized connection.
- Dispatch materials: Prepare your service area, accepted appointment types, working hours, scheduling time zone, assignment rules, and escalation contact. Identify the scheduling record the connection is supposed to create or update before configuration begins.
- The overlooked gotcha: Decide whether the workflow creates a request for review or an actual scheduled appointment. Those outcomes require different customer messages. A successful handoff must not trigger a booking confirmation if dispatch still needs to approve the visit.
Do not proceed to automatic booking until the supported connection can perform the exact scheduling action you need. If it only transfers inquiry details, use an approval workflow instead. Keep automatic customer confirmations disabled until the full scheduling path passes your tests.
Connection scope
- Confirm the supported connection. Ask the setup contact whether RelayKite can send appointment information to your Jobber account through an authorized method. Request the exact destination record, supported actions, permission requirements, and error-handling process. Do not assume a native integration or a specific automation platform.
- Choose the permitted action. Write down whether the workflow submits a request, creates a scheduled appointment, or updates an existing scheduling record. Restrict the initial scope to the action your connection supports and your dispatcher approves.
- Assign ownership. Name the person who approves access, the person who maintains scheduling rules, and the person who handles failed transfers. Decide where those failures become visible and how staff acknowledge them.
- Document the actual configuration. Use the field names and controls shown in your confirmed connection. Record their exact labels in your internal runbook rather than relying on generic instructions that assume a particular interface.
Expected result: You have an authorized connection method, a defined scheduling action, and an accountable owner. You also know whether the first release will create appointment requests or confirmed appointments. That distinction controls the rest of the setup.
Lead mapping
- Define the intake details. Specify the customer name, contact information, service address, requested service, and preferred appointment window. Separate required scheduling details from optional notes. Avoid collecting information that has no purpose in the workflow.
- Set customer matching rules. Decide how the connection identifies an existing customer and service address. Specify what happens when a contact detail matches but the address differs. Route ambiguous matches to review rather than silently attaching the inquiry to the wrong property.
- Map the scheduling information. Match each intake detail to the destination field supported by the connection. Confirm how appointment windows, service descriptions, and conversation notes are represented. Do not place essential dispatch information only in a field staff rarely read.
- Preserve the inquiry reference. Require a traceable reference connecting the original inquiry to its scheduling outcome. Define how repeat submissions are recognized so a retry does not become another appointment request.
Expected result: A dispatcher can identify the customer, property, requested work, and source inquiry without reconstructing the conversation. An incomplete address or uncertain customer match creates a review task, not a guessed booking.
For a 2026 intake review, check the meaning of each field as well as its presence. A preferred date is not an accepted date. A customer's description of an equipment problem is not a technician diagnosis.
Scheduling rules
- Define eligibility. Specify which services and locations qualify for automatic scheduling. Keep requests needing diagnosis, special equipment, unusual access, or dispatch judgment outside that scope unless you have explicit handling rules.
- Set availability boundaries. Document the scheduling time zone, working hours, permitted appointment windows, and assignment requirements. Confirm that the supported connection checks the scheduling constraints your business needs before accepting a visit.
- Define confirmation timing. Send a booking confirmation only after the destination accepts the appointment. If the workflow submits a request for approval, tell the customer that the appointment is awaiting confirmation. Keep those messages separate.
- Create the exception route. Assign requests with incomplete details, conflicting availability, unsupported services, or failed transfers to a named review process. Emergency inquiries need your business's escalation instructions; a booking workflow is not an emergency-response guarantee.
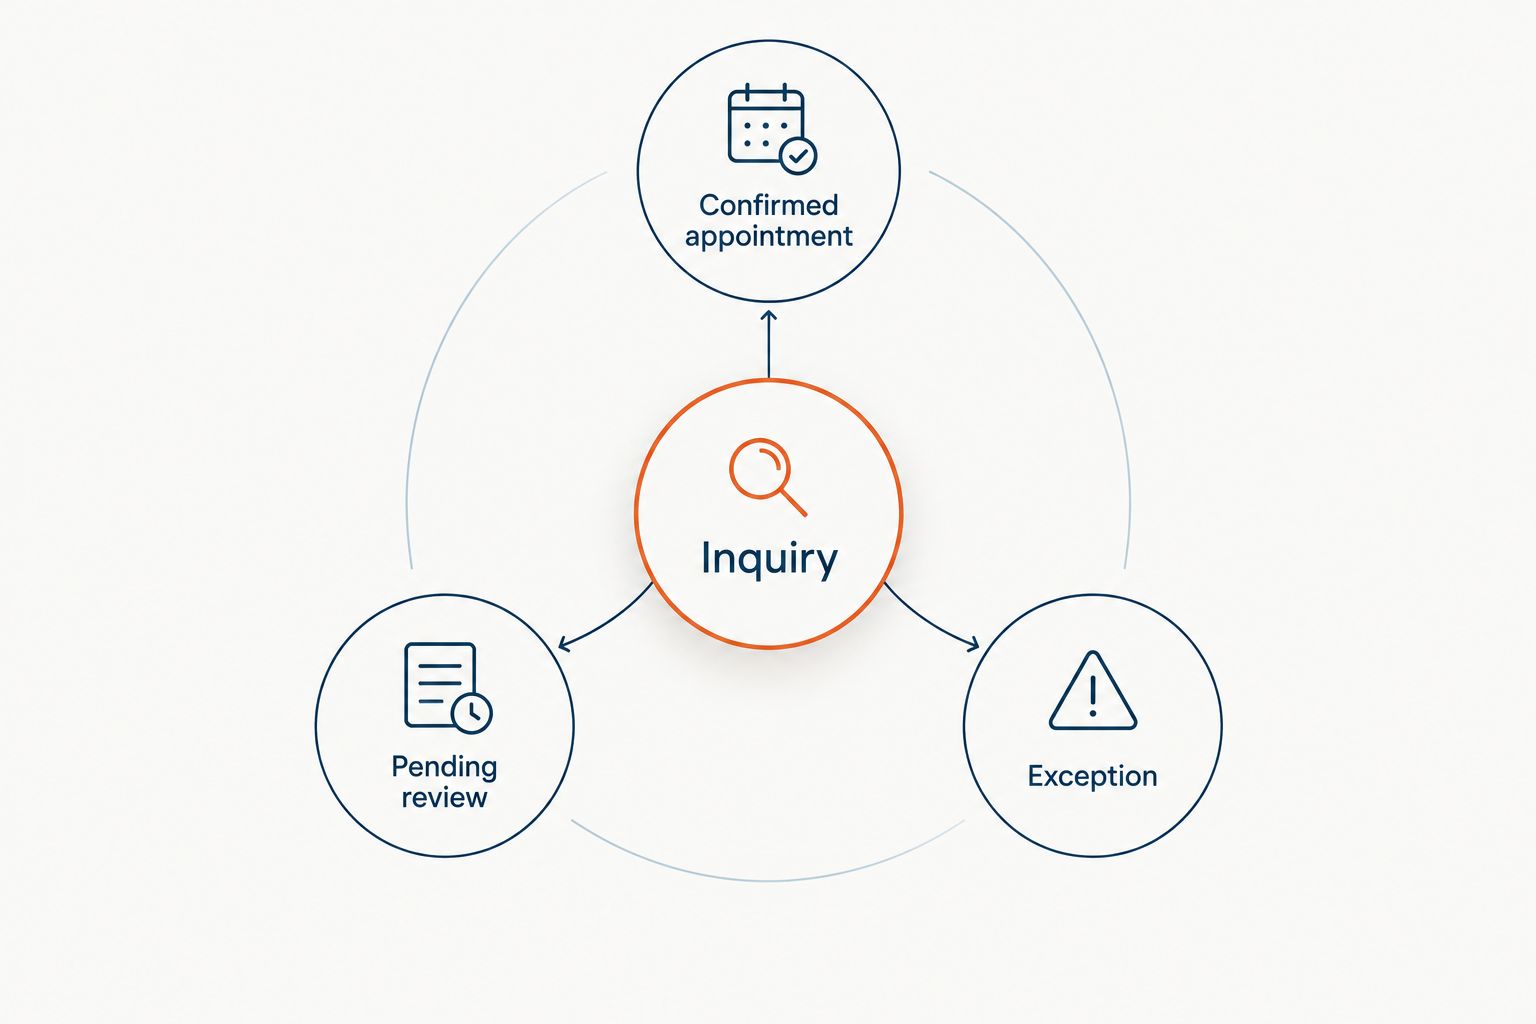
Expected result: Every inquiry reaches an explicit state: confirmed appointment, pending review, or exception. Staff and customers receive messages that match that state.
Use these same states throughout the handoff. Otherwise, one part of the process can call a request scheduled while another still treats it as unapproved.
Acceptance tests
- Submit 3 test inquiries. Use an eligible request, a request with incomplete details, and a request outside your scheduling rules. Mark them as tests and prevent unintended customer messages or live dispatch commitments.
- Repeat 1 inquiry. Send the same test inquiry again through the supported process. Check that the workflow recognizes the repeat or sends it to review instead of producing a duplicate appointment.
- Check both sides. Compare the original intake with the resulting scheduling record. Inspect the customer match, address, requested work, appointment window, status, and confirmation message. A successful transfer indicator alone does not establish a correct appointment.
- Test the exception path. Verify that a rejected or incomplete transfer reaches the responsible staff member. Confirm that the customer does not receive a false booking confirmation while the request remains unresolved.
- Approve the release. Have the dispatch owner sign off on the observed outcomes before enabling customer-facing automatic confirmations. Record the accepted rules and the person authorized to change them.
Expected result: Your tests demonstrate the intended scheduling outcome, duplicate handling, and failure visibility. These are recommended acceptance tests, not performance claims or guarantees.
Retain the test record for your 2026 configuration. When an appointment type, assignment rule, or connection permission changes, repeat the affected checks before expanding automation.
Variant: require approval before scheduling
Use dispatcher approval when the inquiry provides enough information to start a conversation but not enough to commit a technician. This is a workflow design option; enable it only through actions your confirmed connection supports.
| Workflow | Best for | Advantage | Limitation | Customer message |
|---|---|---|---|---|
| Automatic scheduling | Eligible requests with explicit availability and assignment rules | Removes a separate approval handoff for qualifying requests | Requires reliable scheduling checks and booking authority | Appointment confirmed only after acceptance |
| Dispatcher approval | Requests needing service, territory, or technician review | Keeps the scheduling decision with dispatch | Requires staff to complete the handoff | Request received; appointment awaiting confirmation |
For the approval variant, collect the customer's details and preferred window, then send the request into the agreed review process. Assign an owner and keep the pending status visible. When dispatch accepts the appointment, send the confirmation through the designated communication process.
Choose dispatcher approval when the workflow cannot verify the constraints needed for a real booking. Automatic scheduling is not the better option simply because it contains fewer manual steps.
A 2026 rollout can start with approval-based requests and later expand to automatic scheduling for a narrower eligible category. Change the booking authority deliberately; do not let a message-template edit accidentally change what customers believe has been confirmed.
Troubleshooting
The customer receives confirmation, but no appointment exists
Check the event that triggers the customer message. An inquiry submission or successful information transfer is not proof that the scheduling destination accepted an appointment. Move confirmation to the accepted-booking event supported by your connection; otherwise, use a pending-review message.
The same inquiry creates duplicate requests
Inspect the inquiry reference, repeat-submission handling, and retry rules. Define what makes two submissions the same inquiry before increasing automation. Send uncertain matches to review, especially when one customer requests work at different addresses.
The appointment has the wrong time or property
Compare the original intake with the mapped destination fields. Check time-zone interpretation, appointment-window wording, customer matching, and service-address selection. Correct the mapping and repeat the affected test before restoring automatic confirmation.
Requests disappear after an access change
Check whether the authorized connection still has the required access. Account changes and revoked permissions need an explicit recovery process. Route unresolved requests to staff, review the transfer history, and check for duplicates before resubmitting anything.
Dispatch receives requests nobody owns
Treat this as a workflow problem, not a messaging problem. Assign a review owner and a place to acknowledge exceptions. A queue without ownership does not complete the handoff, even when every field arrives correctly.
Customize your workflow
Expand eligibility before expanding promises. After the initial workflow passes its checks, add another service type or territory only when its scheduling rules are documented. Reuse the same acceptance process rather than assuming the original setup covers every inquiry.
RelayKite provides managed HVAC lead response and appointment setting, so your configuration should define both the conversation and the dispatch handoff. Specify which details the response process collects, which questions require staff, and which outcomes it is authorized to communicate.
For businesses with several service territories, the call answering guide for multi-location HVAC companies is a related planning resource. Keep location-specific routing and scheduling decisions explicit in your own setup.
For your 2026 maintenance plan, assign someone to review changes to working hours, service areas, appointment types, and account permissions. Update the response instructions and scheduling rules together. Customers should not receive promises based on an old dispatch policy.
FAQ
How do I connect RelayKite to Jobber for automatic scheduling?
Start by confirming a supported connection method and the exact scheduling action it can perform in your Jobber account. Then define intake mapping, booking permissions, confirmation timing, and exception handling before testing the full workflow.
Does this guide establish that a native Jobber connector exists?
No. This guide defines configuration requirements and acceptance checks; it does not establish a native connector, a specific interface, or supported synchronization actions.
Can every HVAC inquiry become an automatic appointment?
Only requests that meet your documented scheduling rules should enter automatic booking. Requests needing service clarification, assignment decisions, or emergency escalation should follow a separate review process.
What's the difference between an appointment request and a confirmed booking?
An appointment request collects scheduling intent; a confirmed booking has been accepted by the scheduling destination. Customer messages must reflect that difference, especially when dispatch approval is still required.
How do I prevent duplicate appointments?
Define a traceable inquiry reference and repeat-submission handling in the supported connection. Test a repeated inquiry and review ambiguous customer or property matches before enabling automatic scheduling.
What should happen if the Jobber scheduling handoff fails?
A failed handoff should create a visible exception assigned to a responsible staff member. Do not send a booking confirmation until the scheduling destination accepts the appointment.
What should I test before enabling the workflow in 2026?
Test an eligible inquiry, an incomplete inquiry, an out-of-scope inquiry, and a repeated submission. Verify the resulting records, customer messages, and exception ownership before approving automatic confirmations.
One last thing
Test the confirmation message as carefully as the scheduling record. A correctly collected inquiry can still create a bad customer experience if the message promises an appointment that dispatch has not accepted. Keep a real example of each approved outcome in your runbook so staff can recognize the difference immediately.